
I've been thinking about making a mini-game for a change, and it's been on my mind for a while.
I already mentioned Elevator Action Returns would be perfect for Jo4kyx's Detective Rod, but the scope is way too big. So I thought about shrinking it down to its core and creating a simpler game from it:
For starters:
The goal is to show the website users how to create a game from scratch—and not just mindlessly replacing sprites or texts. Starting from selecting a game engine that matches what’s needed and fits the workflow. Then, iterating step-by-step from moving squares to moving sprites, while also designing sounds and music along the way.
I think that could be very interesting, and a breath of fresh air 😉
-
I'll update this first post with the ongoing validated information with Jo4kyx.
First, we are going to choose the game engine in order to make a 2D platformer without wasting time on complicated things.
Here are the game engine I've been thinking of:
Gamemaker
Construct 2
https://www.construct.net/en/construct-2/download
Construct 3
https://www.construct.net/en/make-games/games-editor
Godot
Then there are the weird engines such as GB Studio that permits to create Game Boy games. It looks awesome, but maybe better for another project...
-
Overall, I think Construct 3 could fit our needs. Once the game is done and working, I can just pay one month of subscription to produce the exe.
I already worked with Construct 2 years ago to make Jerk. The no code is relatively simple, as long as you do simple things, and Construct 3 works more or less the same.
-
Please take a look at those and tell me what you think.
Hola, cuanto tiempo sin pasarme por aquí, estaba pensando en crear un último personaje para el juego que tanto me hizo feliz y mejoro mi arte (BASTON), y encuentro esto :0, veo que no as tomado en cuenta un motor parecido a construct 3 pero gratis al 100%, el motor como tal es GDevelop, no es por hacerle propaganda pero e trabajado con varios motores, también soy programador y a decir verdad GDevelop acelera el flujo de trabajo un montón, y puedes agregarle código en js para manipularlo como se te antoje, está en constante crecimiento con extensiones de la comunidad y oficiales
Por cierto Feliz Año para todos
Thanks for your excellent input, Roberth. I wasn't aware of GDevelop. So I took a good closer look at it, although I was put off initially by their promotion of companies like McDonald’s, Starbucks, and Amazon—not the best first impression 🫤...
The interactive tutorials are really nice, but their example games mostly feel like uninspired clones, which wasn’t very appealing. That said, this might be due to the creators rather than the tool itself. I watched some videos showcasing the best games made with GDevelop, but they still seemed like a mix of Scratch projects and early 2000s Flash-era games. Do you know of any 2D platformers made with GDevelop that look, feel, and play well?
On the flip side, maybe creating a game that genuinely looks and feels great in GDevelop could be a fun and challenging exercise.
For comparison, here’s what I found for GDevelop:
And here's the same for Construct 3:
I’ve also read several pros and cons on various sites, and GDevelop seems quite similar to Construct 3. They are both easy to use, which is a good point. Then both tools feel “free,” but they lock basic features behind subscription plans. Honestly, I miss the simplicity of Construct 2’s one-time purchase model.
-
In the end, after spending a couple of hours comparing and testing GDevelop and Construct 3, I think I’ll go with Godot. While it’s not a no-code engine, creating a platformer / shooter isn’t overly complex, and Godot provides an abundance of high-quality tutorials.
The most valuable point for me is that whatever you create with Godot is entirely your own property, without being locked into the GDevelop or Construct ecosystems.
Godot es excelente también, su lenguaje es muy similar a Python así que no es tan difícil hacer la lógica, y tienes razón en cuanto a que tú proyecto no dependa de nadie, suerte en tu proyecto, ya quiero ver el resultado 😉
Thanks 🙂
So, Jo4kyx and everyone else, I hope you're following along!
To download Godot, head over to: https://godotengine.org/download/windows/
Once downloaded, you can unzip it anywhere. One of the great things about Godot is that it’s just a single executable file—no installation required.
When creating a new project, you’ll have three configuration options:
The higher the compatibility, the fewer graphical features are available. However, since we’re making a 2D platformer, that won’t matter much. I think we can aim for the Mobile configuration, so the game can run on Android. But be prepared—producing an APK for Android isn’t exactly straightforward (you’ll see).
Next is Version Control. This is a fantastic tool for rolling back mistakes or collaborating with others on the same project. However, even after years of using Git/GitHub, I still find it one of the most stressful activities—it’s easy to accidentally mess up a project. Still, version control is essential when multiple people are working on the same files, as it helps prevent conflicts (though it’s not entirely bulletproof).
Alternatively, for simpler collaboration, we can use file-sharing solutions like Dropbox, Google Drive (though I’d prefer not to mix work files with private emails and Google Photos), or Microsoft OneDrive.
I’ll start by testing how well Dropbox handles a new Godot project. Stay tuned!
Hi! Sorry for being absent. I've been keeping up with everything but I haven't had much time these days between the new year and my internship!
Just want to say for know that I like that you went for Godot as I know nothing about programming and I like its accesibily and its ease of learning 😁
I'll give more and proper responses from later on. I'm very excited for what is to come from now on!
No problemo, studies always come first 😎
I’m diving into Godot and working on smoothing things out to make everything easier later on.
I started directly with this short tutorial:
By the end of the tutorial, I had a moving and jumping square that could collide with immovable platforms, and a camera that sticks to it. However, there were a few details the tutorial didn’t explain, such as how to switch between the 2D world and the Script windows using the top buttons:
This might be covered in a previous tutorial, but since it’s pretty basic, let’s move on.
-
While writing this, I decided to try exporting this early project as an .exe to discover how intuitive the process is:
I clicked Download and Install, and it started downloading 1.62 GB. This confirms what I suspected—a lightweight 129 MB program isn’t enough for Godot to produce working builds. Make sure you have enough space if you want to export projects. Thankfully, the files install in the Windows user account folder, not in Dropbox.
Just so you know, ZGameEditor, which I use to make Omeganaut, only weight 15 MB and can produce tiny exe in seconds. But you'll have to program everything. And I mean everything... 😛
Anyway, back to Godot:
After downloading the templates, there are a few export options, but nothing critical for now. It also warns (yellow text = warning) about the rcedit tool needing configuration. Since it’s not an error, I skipped it for now.
I clicked Export Project, choosing whether to include Debug mode or not. Debug mode adds a console file for tracing issues, which will be useful later.
The result:
-
In just 10 minutes, I had a working .exe with a basic Godot character that moves and jumps around. It’s not a full game yet, but progress is way faster than coding everything from scratch.
One note: The exported .exe weighs 80 MB. Compared to ZGameEditor, that’s massive—but still much lighter than the Unity or Unreal Engine behemoths.
From here, we can iterate.
I see a lot of people wasting time on game menus or drawing irrelevant things instead of focusing on the core of the game—the part the player will engage with 99% of the time. Sure, menus and visuals are important, but for now, let's concentrate on the fundamentals that make the game enjoyable to interact with—even without a purpose, enemies, story, or graphics.
I'm talking about the major 3Cs:
And for that, my next move will be to start working with your available BASTON sprite sheet. I don't think this is the last version of it, but it's going to be interesting in order to verify how to replace sprites later on.
I'm forcing myself to continue tomorrow, otherwise I'm going to spend the night on that 😛
Let's start with the
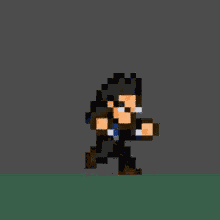
Since Jo4kyx has already created a great sprite sheet of Rod for BASTON, I'll use it for this project.
To get started, I continued following Kaan Alpar's tutorial video:
In this tutorial, the sprite being used is divided into several image files—one file per animation.
Another thing to note is that his knight sprite isn't centered within the image. This requires a small calculation in the code to re-center it. While this approach works, I prefer to center the image from the start. Imagine if 1000 knights were displayed on the screen—each frame, the computer would need to re-center them using the code. While this might not cause noticeable issues with modern hardware, it's not an efficient practice.
However, there is excellent information in the tutorial, such as organizing the folder hierarchy or using Rendering > Textures > Canvas textures set to "Nearest" to prevent sprites from looking blurry.
Another crucial takeaway is reducing the camera size instead of scaling the sprite to make it appear larger. Scaling the sprite would mean having to multiply all the coordinates by the scale factor later—a mistake I made when I first started working on Dragon Ball Devolution back in 2004... You don't know how lucky you are to have all this knowledge readily available for free on the internet nowadays.
Rod's sprite sheet is a single file containing all the frames for every animation. When I replaced the image in Godot with Rod's sprite sheet, here's what I got:
![]()
So, I needed to slice the sprite sheet into individual frames by specifying the number of columns and rows, just like in BASTON.![]()
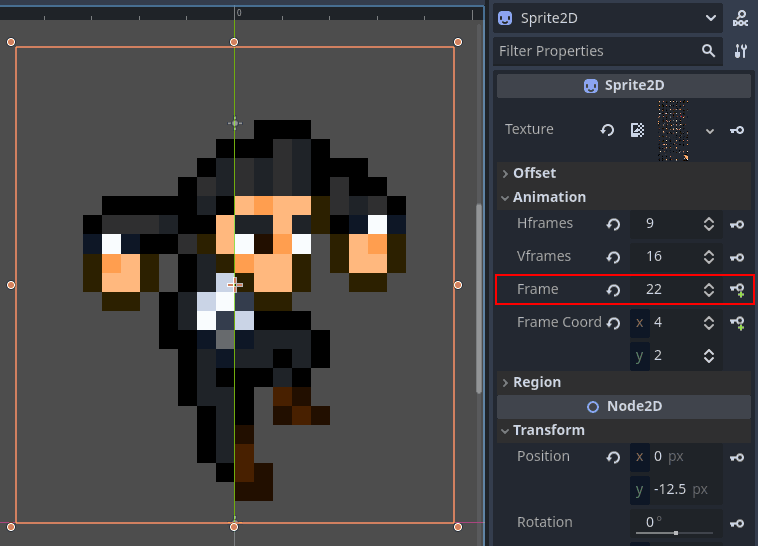
The positioning along the y-axis ensures Rod's feet are on the ground, represented by the red line. The sprite is already centered on the x-axis, thanks to Jo4kyx. Currently, the y-offset is set to -12.5, which is a bit odd because the height of the frame isn't even. We'll need to fix this in the final sprite sheet, as it will also affect the size of the player's collision box.
Here's our hero after adjusting the bounding boxes, reducing the platform sizes, and setting up the Game Viewport. One thing I appreciate about Godot is how straightforward it is to configure the Viewport and its scaling for fullscreen display. In contrast, setting this up in Haxeflixel—the language I used to program BASTON—was a nightmare. I'm even starting to consider remaking BASTON in Godot instead... 😛

Even with a window size of 320x240, represented by the pink rectangle, Detective Rod appears tiny. But that’s because he’s only 21 pixels tall. We’ll need to adjust this with the final sprite sheet. This highlights the interconnected nature of the 3Cs: you can’t properly adjust one without considering the other two.
Let’s adjust the code so Rod doesn’t move at light speed. Remember, the original Godot sprite was 10x bigger, so we need to slow down his walking and jumping to match his smaller size.
In the next part, I'm going to implement a few basic animations.
Following the last video tutorial, I added an AnimationPlayer node to the Player. What I did differently was how I distributed the frames along the animation timeline.
Once the AnimationPlayer is selected, the animation timeline will appear. Just like in the tutorial, create a new animation—let’s call it "fall." Now, select the Sprite2D in the Player and click the key to add the current frame to the timeline, at the cursor’s position.
It will open a confirmation window, just press "Create".
And here's the frame in the Animation timeline: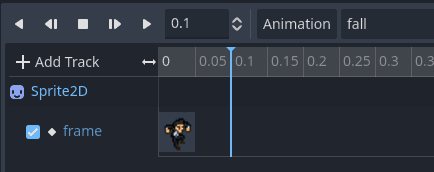
Then move the timeline cursor, right mouse click and add a new keyframe: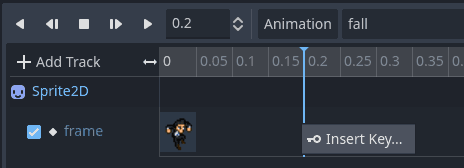
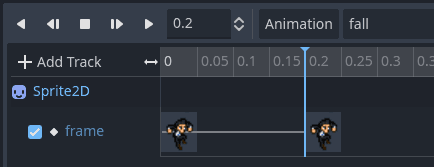
The line between the two frames indicates that they are the same. To change the second frame, select it and adjust its AnimationTrackKeyEdit value in the right column: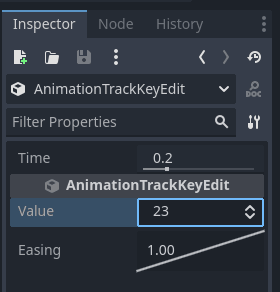
Continue to do that until you get your full animation: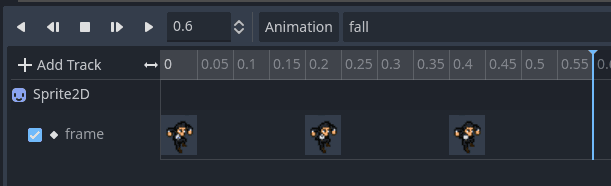
(Note for later: I should use the walk animation for those screenshots instead, as the fall animation is too subtle)
I followed the tutorial and adjusted the code accordingly. Now, Detective Rod can idle, run, jump, and fall with style:
It's interesting to note that, according to the video tutorial, the entire sprite is flipped horizontally so that Rod faces left when moving left. While this works for now, it won’t work when Rod holds his gun. Unless, of course, you don’t mind the gun jumping from the right hand to the left hand depending on which direction Rod is facing.
And with that, I think I've spent about 20 minutes on this project, starting from scratch without knowing Godot. What takes time is taking the screenshots and writing things here along the way 😛
-
Now I'm going to share the project with Jo4kyx so we can start advancing together:
For starters, do you have Dropbox?
If not, I'll send you an invitation. It is very practical to share your files between your machines, or with other people.
Regarding the spritesheet, should we keep it as is, or use a more recent version?
No need to post new sprites here, it will be shared via Dropbox.
After that, I'll let Jo4kyx make changes to those first four animations. Once those are ready, we'll focus on the other ones while I adapt the code to handle them 😎
Alright, I'm here, sorry to keep you waiting
I've read it all and I'm fascinated with all of this. I'll be installing Godot right away so I can see what you're working with, though considering my knowledge, experiencie and lack of free time I can't see myself helping with the coding that much, but I'll try anyway. Godot seems friendly enough 😀
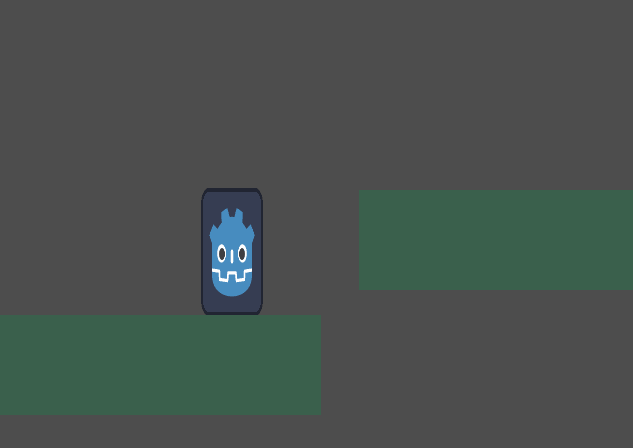
About the sprites, I can take care of those no problem. I'd like this little game to have a unique style of its own, but nothing to complictaed either. Maybe just a "Glorified Baston" that could look something like this: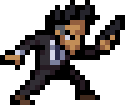

Tell me what you think, I'm open to go to any artistic direction with this project to be honest.
I also have no problem with me animating the movements for each side. It'll take more time, but at least I have no rush with this project (as you might have seen 😀 )
I don't have dropbox so I'll wait for your invitation. It'd be good to make a list with the sprites and animations you need for know so I can get to work on it 😁
--
On a side note, though we can leave this discussion for later on: The only thing that "troubles" me about this gameplay for Rod is that I wrote this character as a pacifist. Eventhough he carries a gun, he rarely uses it. Whenever he does he has huge internal conflict about it. Rod does not kill by any means, and this could cause problems if we want to keep the gameplay simple.
I was thinking about a few ways in which we can get over this, but for this project I can just look past this detail if it causes any trouble. I'm more into making a fun game rather than respect some thing I wrote 4 years ago 😀
Cool 😎
Again, there’s no rush—this topic is open for when we have time to work on it. In the meantime, I can continue on my side by learning more about tile sets or reflecting on the new information you just shared about pacifist Rod.
-
Regarding Dropbox, simply click this link to create your account and download / install the program:
https://www.dropbox.com/referrals/AAA4n … rc=global9
It’s a referral link, so we’ll both get an additional 500 MB of free space if you use it.
I recommend installing the Dropbox directory at the root of your hard drive, such as C:\Dropbox, instead of in Program Files. This makes it easier to access later. Also, take the quick tour to earn an extra 250 MB of space.
The principle is simple: anything you put in that Dropbox folder will be synchronized online. I only use Dropbox for work, so I avoid storing excessively large files in it. In the options, you can also choose whether Dropbox runs automatically when your computer starts, which can be useful if you're on a laptop with paid Wi-Fi. Files will sync later when you manually run Dropbox again.
Once you’ve installed it, you’ll be able to access your files from any device or directly from the Dropbox website.
I should be notified once you complete the installation, so I can send you an invitation to the shared "Project Rod" folder.
Then we will also discuss that pacifist behavior, which could be very interesting in terms of gameplay. Your sprite is awesome, but I will have some feedback about it as well. You’ll see how even a single pixel can impact an entire project... 😛
Hi jo4kyx.
I sent you the link to the shared Rod folder. You'll find everything you need to start experimenting with the project. I suggest starting with the animation timeline and the sprite sheet I described earlier. I've documented the few lines of code that control Rod's movement—it's not complicated, so you should get the hang of it quickly if you want to try.
Keep in mind that any changes you make—whether adding, removing, or modifying—will sync to my end as well. To avoid unintended issues, you might want to make a copy of the folder first, especially if you're planning to experiment heavily.
If you have questions, let's talk here, as I'd love for others to learn from this process too.
Have fun!
Thanks Txori. I joined the folder and made a copy to experiment a little. So far so good 😎
I'll try to get to work this weekend when I have more time. I'd really like to receive your feedback for the sprite and learn how to make one that is suitable for the rest of this journey 😉
For now no question. I'll try to get a hand of Godot by myself for now but I'll ask you if a get stuck. Cheers!
Superb!
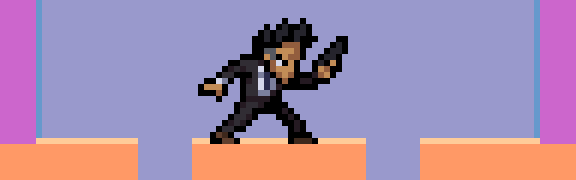
Here’s my feedback on the one pixel that can change the entire game:
You’ve drawn Rod with his left foot slightly higher than the right—by just one pixel. This introduces a sense of perspective, which can feel odd in a purely 2D game because the perspective always remains orthographic. This subtle change effectively turns it into a 2.5D platformer.
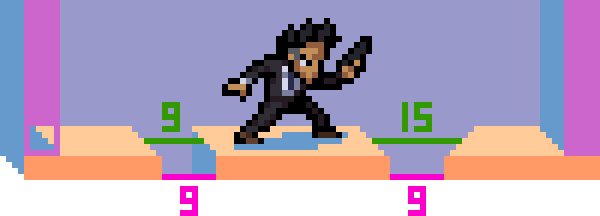
In my example, you can see how the perceived distance between platforms changes significantly depending on how you handle perspective. When perspective is applied, the left and right platforms don’t belong in the same camera viewport—they clash visually, making it feel inconsistent.
To manage Rod's distance from the ground, he’d need a shadow, which would require a light source. And then, for the walls: the one on the left should obscure the sprite if he bumps into it, but the one on the right shouldn’t—unless we intentionally break the perspective. A lot of little problems...
This is why most recent 2.5D games rely on real 3D objects and a perspective camera to handle these challenges. However, that’s well beyond the scope of a straightforward 2D game.
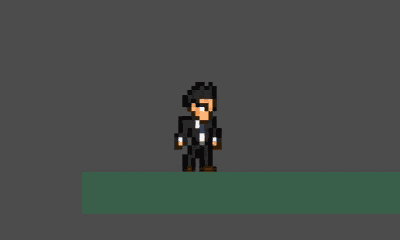
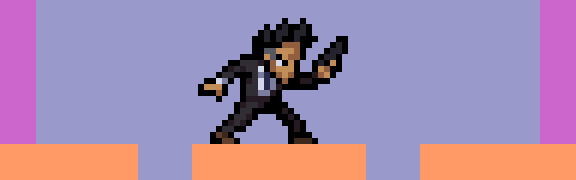
In a pure 2D game, when both feet are on the same level, everything is simpler—but it also feels flat:
Interestingly enough, the first Elevator Action (1983) was kind of a 2.5D game, visually. You can appreciate the perspective mess on the elevators. Is the main character on the ground? Is he jumping?
However, for its sequel, Elevator Action Returns (1994), the game transitioned into a pure 2D experience. While it incorporates a slight false top-down perspective, it doesn’t affect the gameplay because all characters’ feet remain firmly on the same slice layer of the building. This approach adds visual depth without introducing the complexities of true perspective:
The problem is that Rod is only 21 pixels tall, so only one pixel makes a huge difference in the perspective. So here's my final take: both feet on the ground, one pixel top-down perspective on the platforms.
Is that good for you?
On a side note, maybe you can skip the gun for now. I’m still thinking about what to do without a gun—or how to design gameplay where it isn’t used, despite it being in the character’s hand 😉
Great insight!
In that case I'd say your solution is perfect. I'll sprite with that in mind 😎
Before going any further I'd like to decide with you the art direction we're going to take. Do you have something in mind? Any inspirations you'd like to bring into the table?
I really like the style of Elevator Action Returns but I can't see myself spriting that good 😀 Though I'd like to try and sprite without black outlines... We can make a few attempts and see what works best. I'm open to try anything really so we can go slow with this 😉
I think you’re a better art director than me at this point. This is your character, story, and universe. But if I may, here’s some inspiration: 50 years of anime intros with different styles on the same subject: Lupin the 3rd ❤️
But let’s not rush ahead too quickly.
Let’s focus on the basics: Camera, Controls, and Character.
Start with simple animations. Just the essentials, like walking (or running) and jumping. Maybe crouching. At this stage, even a stick figure will do. These basics will define the size of platforms and determine the controls, which will then shape how the camera behaves. We’ll work in loops, refining these three elements until it starts to feel nice to play.
Will it play with a keyboard or a gamepad? That’s part of the controls and will also influence the design of the main character animations.
Once that foundation feels solid, we can introduce a goal for this early alpha—something simple, like reaching a specific point or avoiding obstacles. These could be enemies, dogs, or cameras, represented by very basic placeholder graphics for now.
Later, we’ll consider adding extra actions, like rolling, double-jumping, or firing. But for now, let’s keep it simple—no complex mechanics like hanging from platforms à la Prince of Persia. The goal is to create something clean, functional, and fun before layering in more complexity.
I started experimenting with tiles to simplify the level design process. After a quick search, I decided to use Tiled Map Editor, a free and powerful tool for creating levels based on tile sets. It’s also fully compatible with Godot, making it an ideal choice.
You can download Tiled Map Editor here:: https://thorbjorn.itch.io/tiled
Once installed, launch the program to get started.
Start by creating a new project. This project file will hold all the necessary information for your levels, keeping everything organized.
Next, create a new tile map. This will serve as our first test level where we’ll experiment with Rod’s movements and refine the Camera, Controls, and Character.
Name: tilemap_test
Tile Size: 8x8 pixels (We’re using an 8x8 pixel grid because it fits Rod’s size. Using a multiple of 8 for tile dimensions is a common practice due to its compatibility with math calculations and its legacy from older memory-limited systems used to draw sprites)
Now, create a new tile set for the tile map:
Name: tileset_test
Tile Size: 8x8 pixels (For the tile set, I’ll use the image I posted earlier as the base. This will allow us to define the graphical elements of the level)
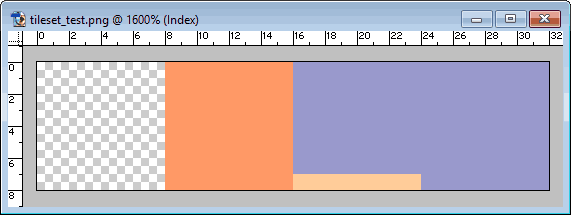
I started by establishing a simple system for tile definitions, based on the image I posted previously:
Using these, I drew the first test level like a picture with the tile set. It includes various configurations—jumps, gaps, and borders—to test how the game will react. Since Tiled Map Editor makes it easy to edit and adjust levels, this is a good starting point to explore gameplay possibilities.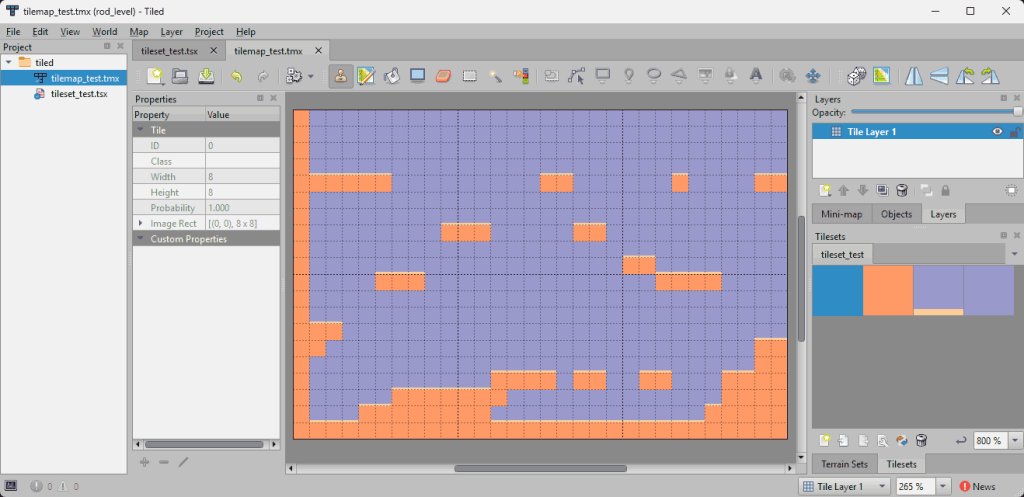
The next step is to figure out how to replace the basic placeholder platforms in Godot with the Tiled Map Editor’s output. Nobody wants to create an entire level using those: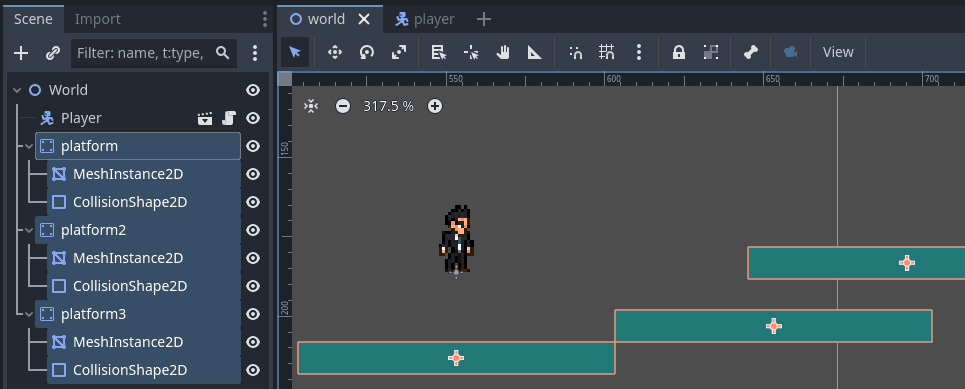
Following an initial video tutorial, I removed the Godot platforms and added a TileMap node to the scene. Upon adding the TileMap node, a warning sign appeared next to it. Hovering over it revealed that TileMap is now considered obsolete and has been replaced by TileMapLayer in Godot’s latest version. As always, just read.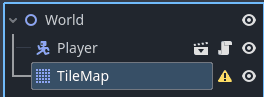
So let's find a nice tutorial that explains how TileMapLayers works:
In this tutorial, I discovered something interesting: Godot itself has robust tile editing tools that can achieve the same results as Tiled Map Editor. So, I'm going to experiment with both Tiled Map Editor and Godot’s TileMapLayer to evaluate their pros and cons. The purpose is to find the easier way to create levels and edit them later on.
I'll be back.
I started by exporting the TiledMapEditor scene to Godot 4 format "tscn".
Turns out that, upon opening the exported file in Godot, it is made of an obsolete TileMap. We can later convert it to TileMapLayer, but this is an unneeded extra step. So let's forget TiledMapEditor for now, and focus on making the game using Godot internal Map Editor.
It's rather simple. When you update your tileset image, just drag and drop it on the TileMapLayer atlas so that Godot automatically detect and cut tiles in it: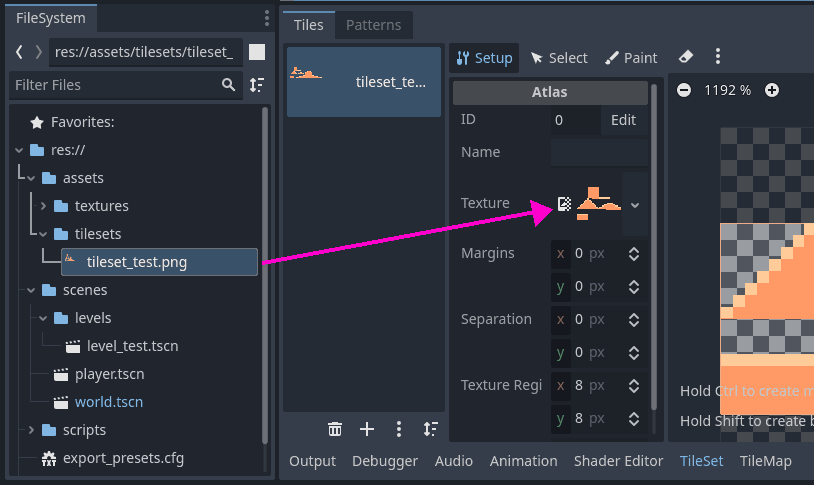
Then we can define the collision shapes and paint them to the tiles: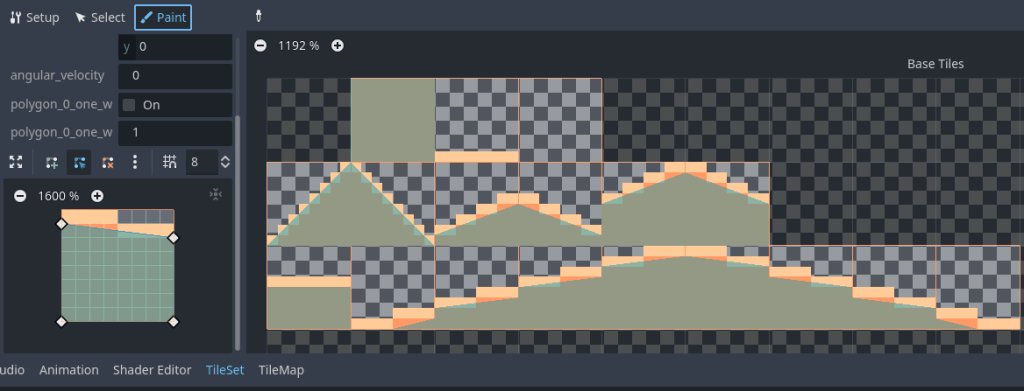
I'm still discovering how collision shapes are working within the game. Do we need to draw each pixel of a stair, or just a 45° slope?
Then in the TileMap tab (bottom of the screen), you can select the tiles and just paint the stage as you want. Contrary to TiledMapEditor, there is no end to the stage size. It automatically adjusts to your content, which is nice.

So here's the current first test level in order to toy with the Camera Controls Character. At this stage, I don't even know if slopes will be used in the game.
I suppressed the background color from my tileset because the principle of TileMapLayers is to have layers. So I can just create another tileset from another image to handle the background. So far it's quite easy and enjoyable 🙂
What do you think about taking photos instead of holding a gun, Jo4kyx?
I just discovered Stringer on the Commodore 64. It’s super old and the music is horrendous, but the gameplay is simple:
You play as a newspaper photographer who has to sneak a photo of a movie star in her room. First, collect the press pass, camera, flash bulb, and door key — then proceed to unlock her room. But watch out! Mr. Angry will chase you, along with other staff members.